Introduction
Cosmetic Entity Linking (CosmEL) is an entity linking tool in cosmetic domain.
Author
- CKIP Lab, Institute of Information Science, Academia Sinica, Taipei, Taiwan.
- Mu Yang <emfomy@gmail.com>
- Chi-Yen Chen <jina199312@gmail.com>
- Yi-Hui Lee <lilyyhlee30@gmail.com>
- Wei-Yun Ma <ma@iis.sinica.edu.tw>
Links
Requirement
- Program and Tools
- Python 3.6.
- CKIPWS Linux version.
- CKIPWS Cython Package 0.2.
- Python Packages
- BeautifulSoup 4.6.
- gensim 3.6.
- lxml 4.2.
- NumPy 1.15.
- PyTorch 0.4.1.
- scikit-learn 0.20.
- tqdm 4.27.
- Documentation Packages (Optional)
- sphinx 1.8.1.
- sphinx_rtd_theme 0.4.2.
- sphinxcontrib-programoutput 0.11.
About
Cosmetic Entity Linking (CosmEL) is an entity linking tool in cosmetic domain. We train a entity linking model from given articles with manually labeling. Usually, it is inefficient to manually label all the mentions. We provide several decision-tree-based rules with laboriously observation, and train the entity linking model by using the labeled data automatically generated by the rule with a small amount of manual labeled data.
Flow Chart
We split our progress in to four parts:
- Database Generation
Generates the database (including the information of brands and products) from raw CSV data.
See also
- Specification - Database Generation
- Quick Start - Database Generation
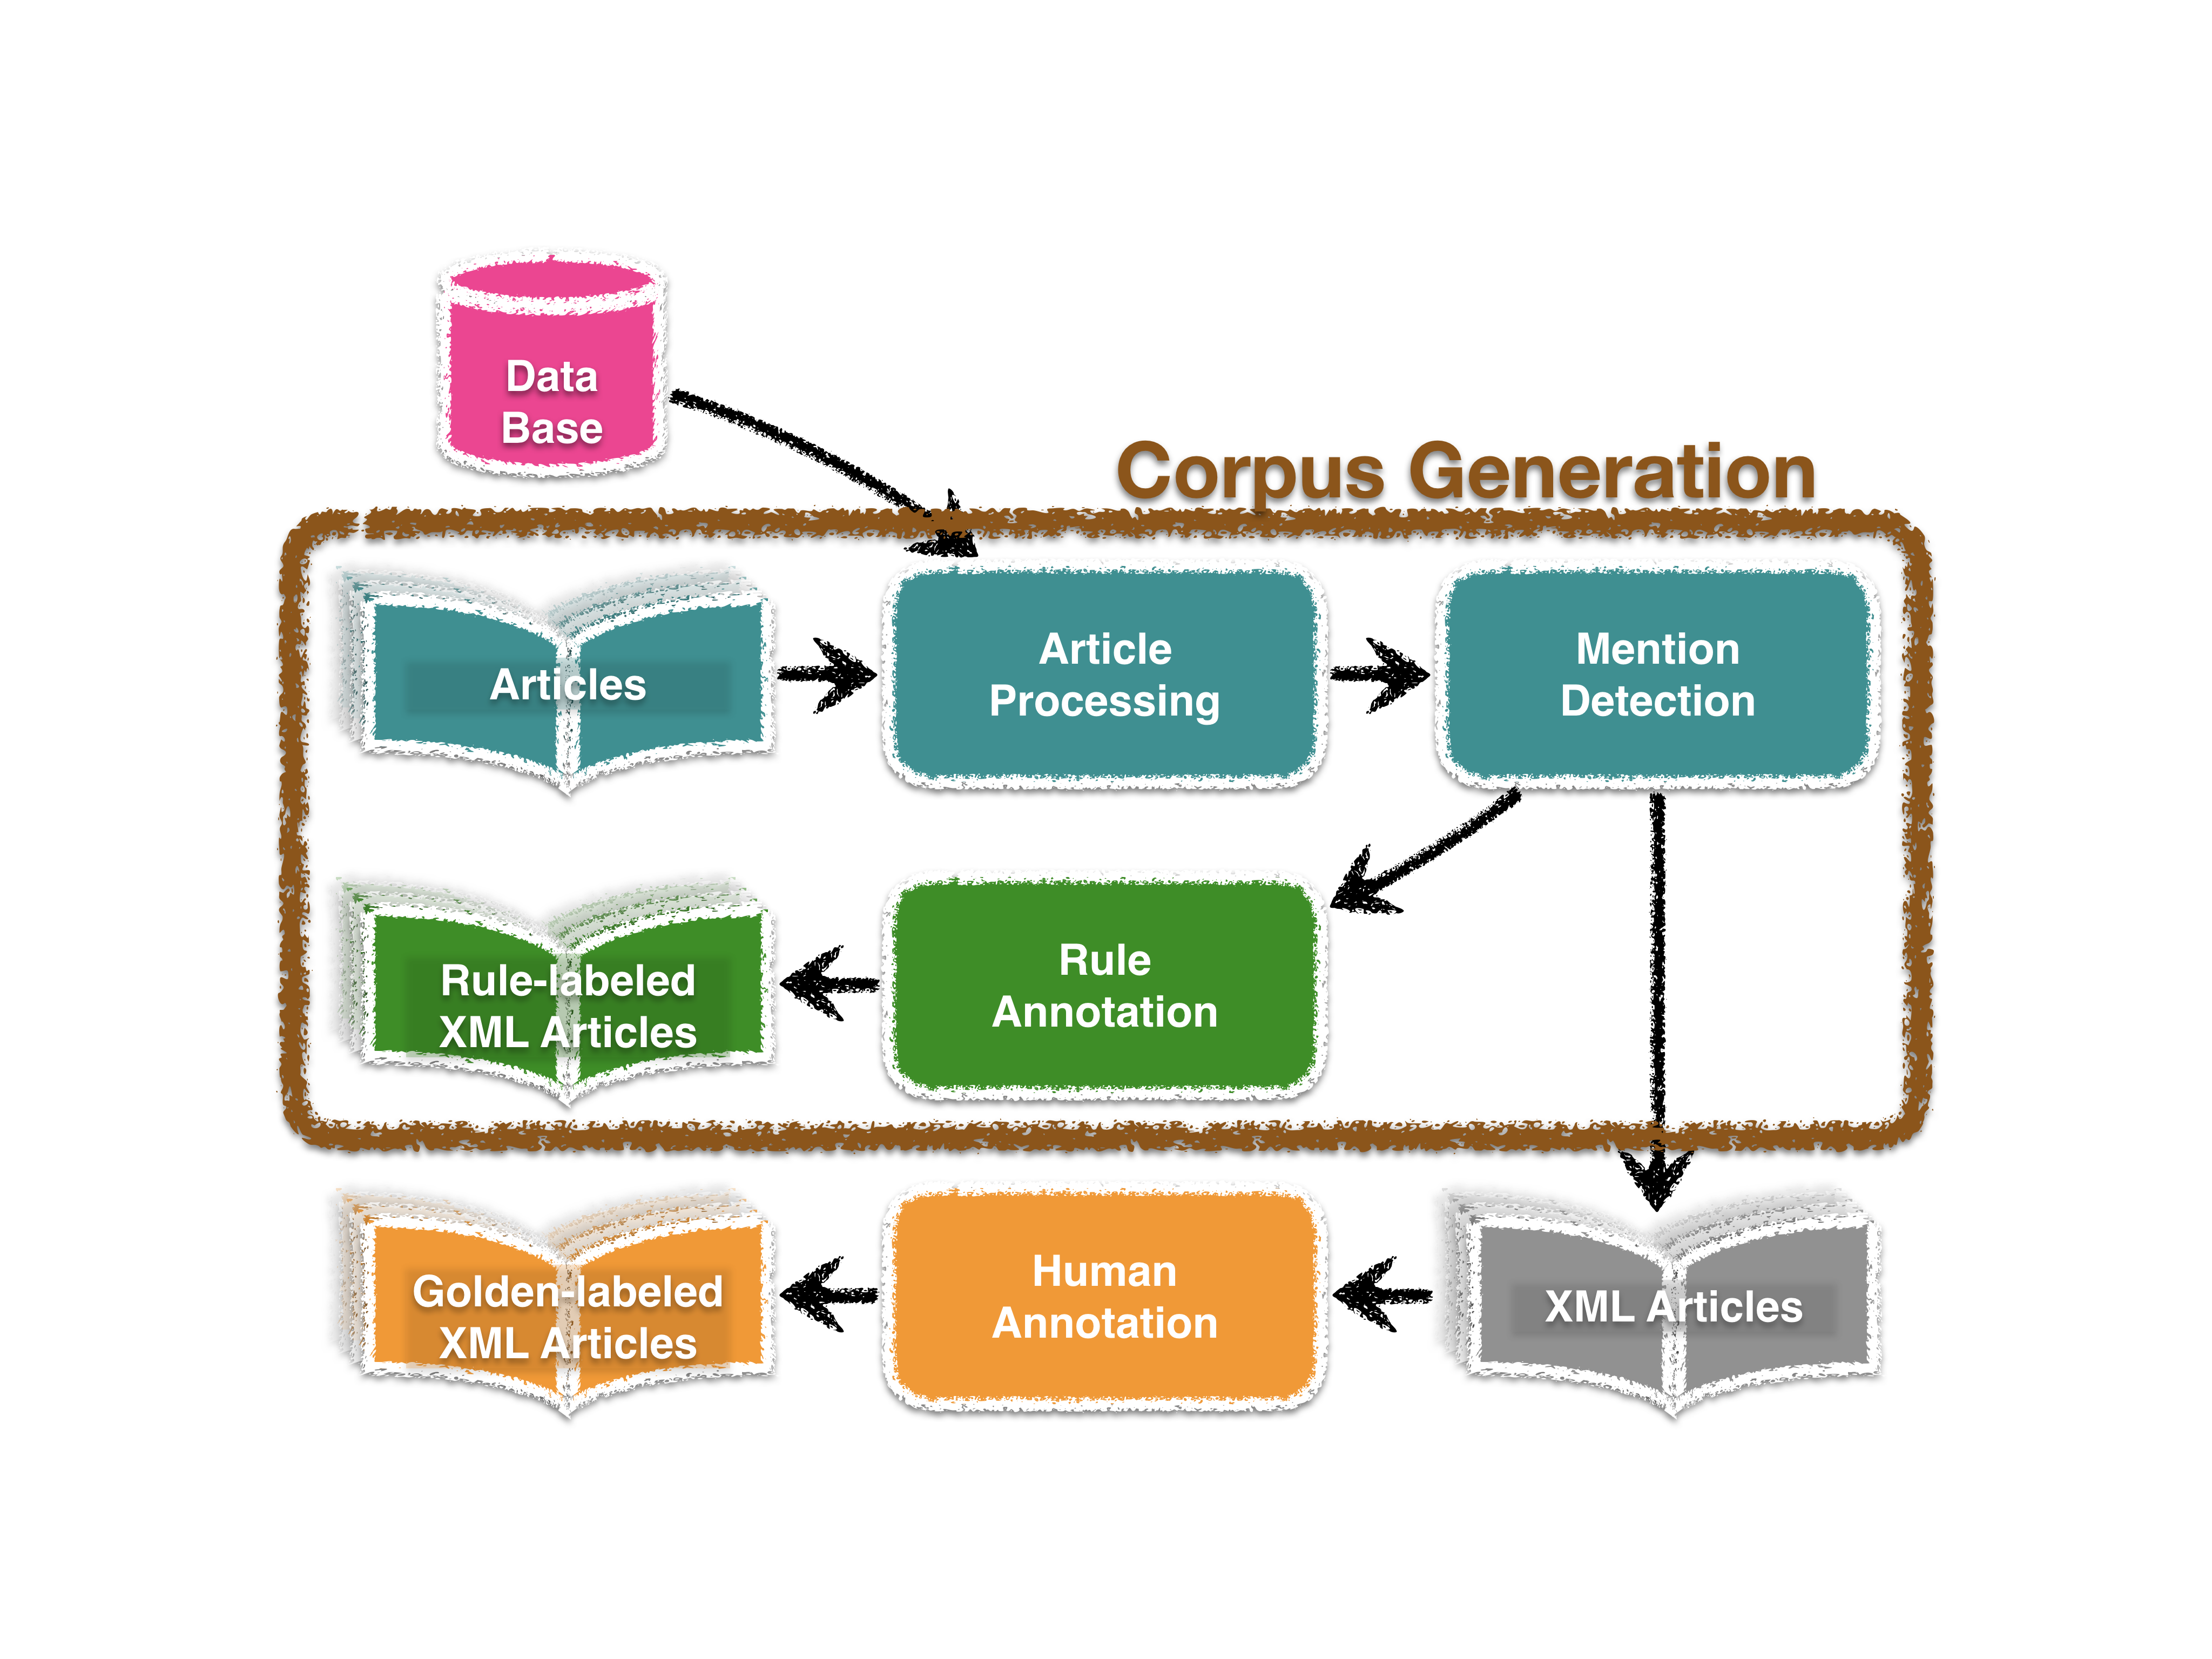
- Corpus Generation
Creates the corpus from articles in plain text. This step exports the rule-labeled articles. Please manually label the XML files to create golden labeled articles.
See also
- Specification - Corpus Generation
- Quick Start - Training
- Quick Start - Prediction
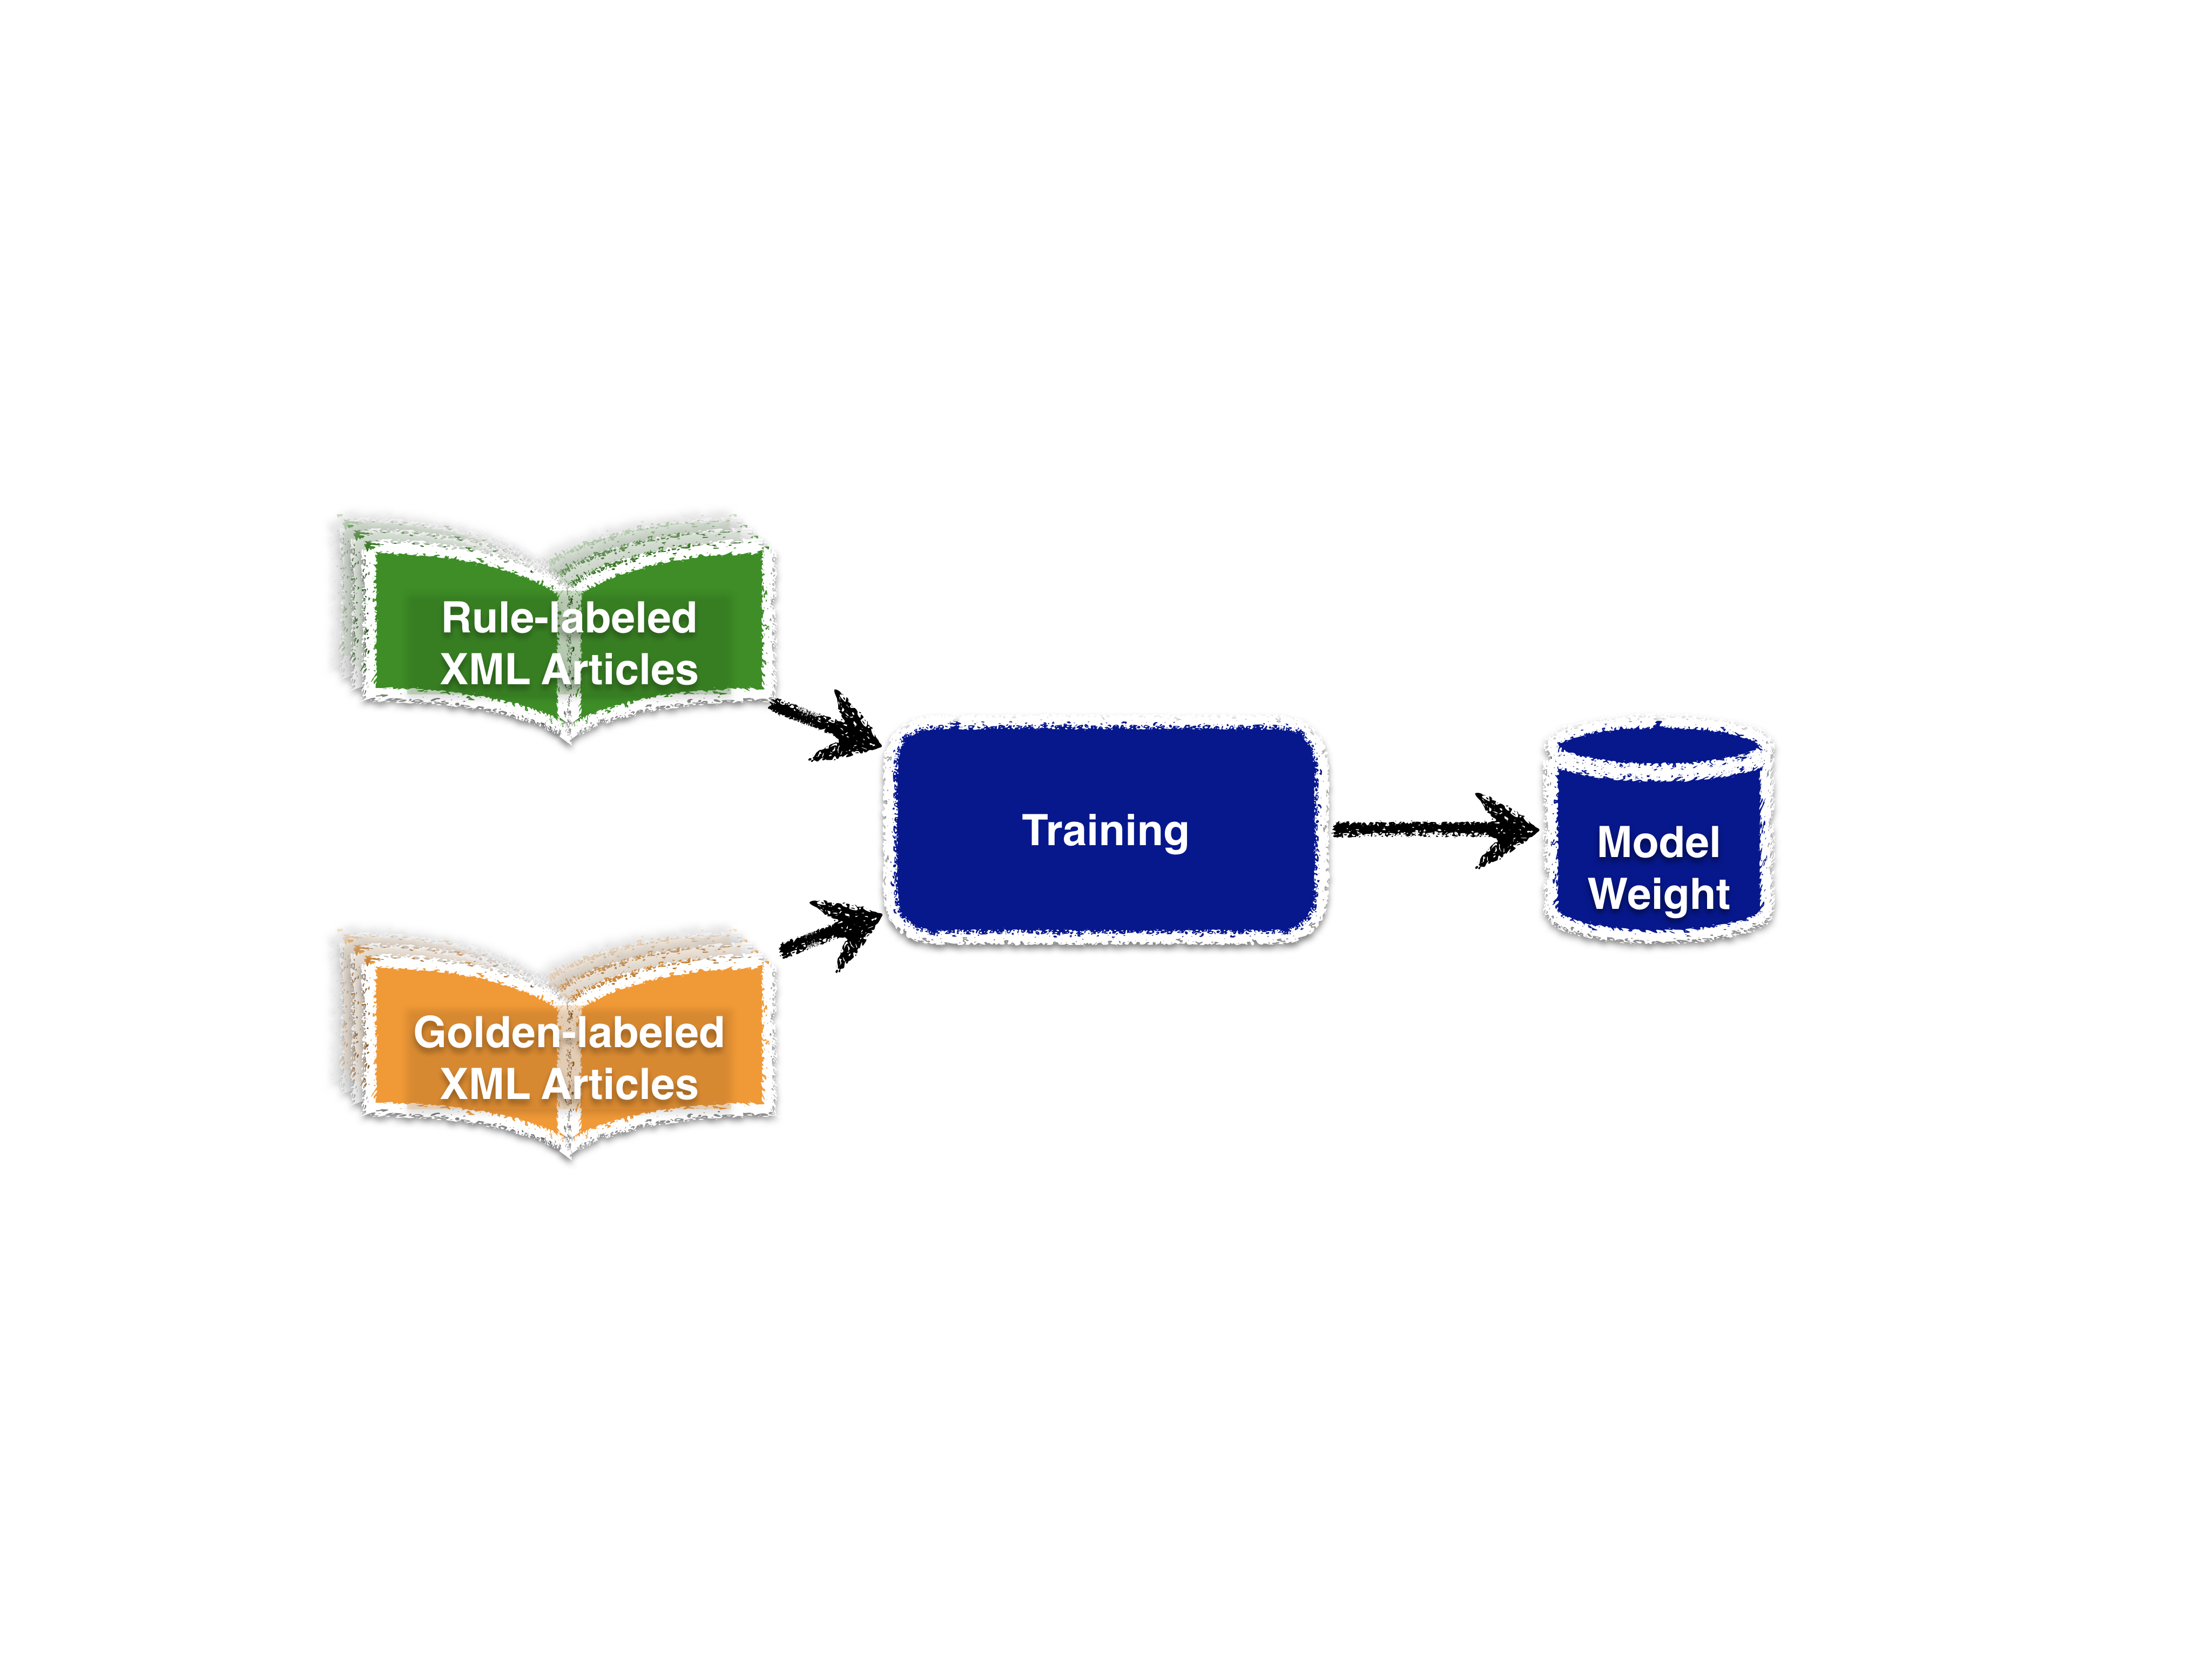
- Training
Trains the model using rule-labeled articles and golden labeled articles.
See also
- Specification - Model Training
- Quick Start - Training
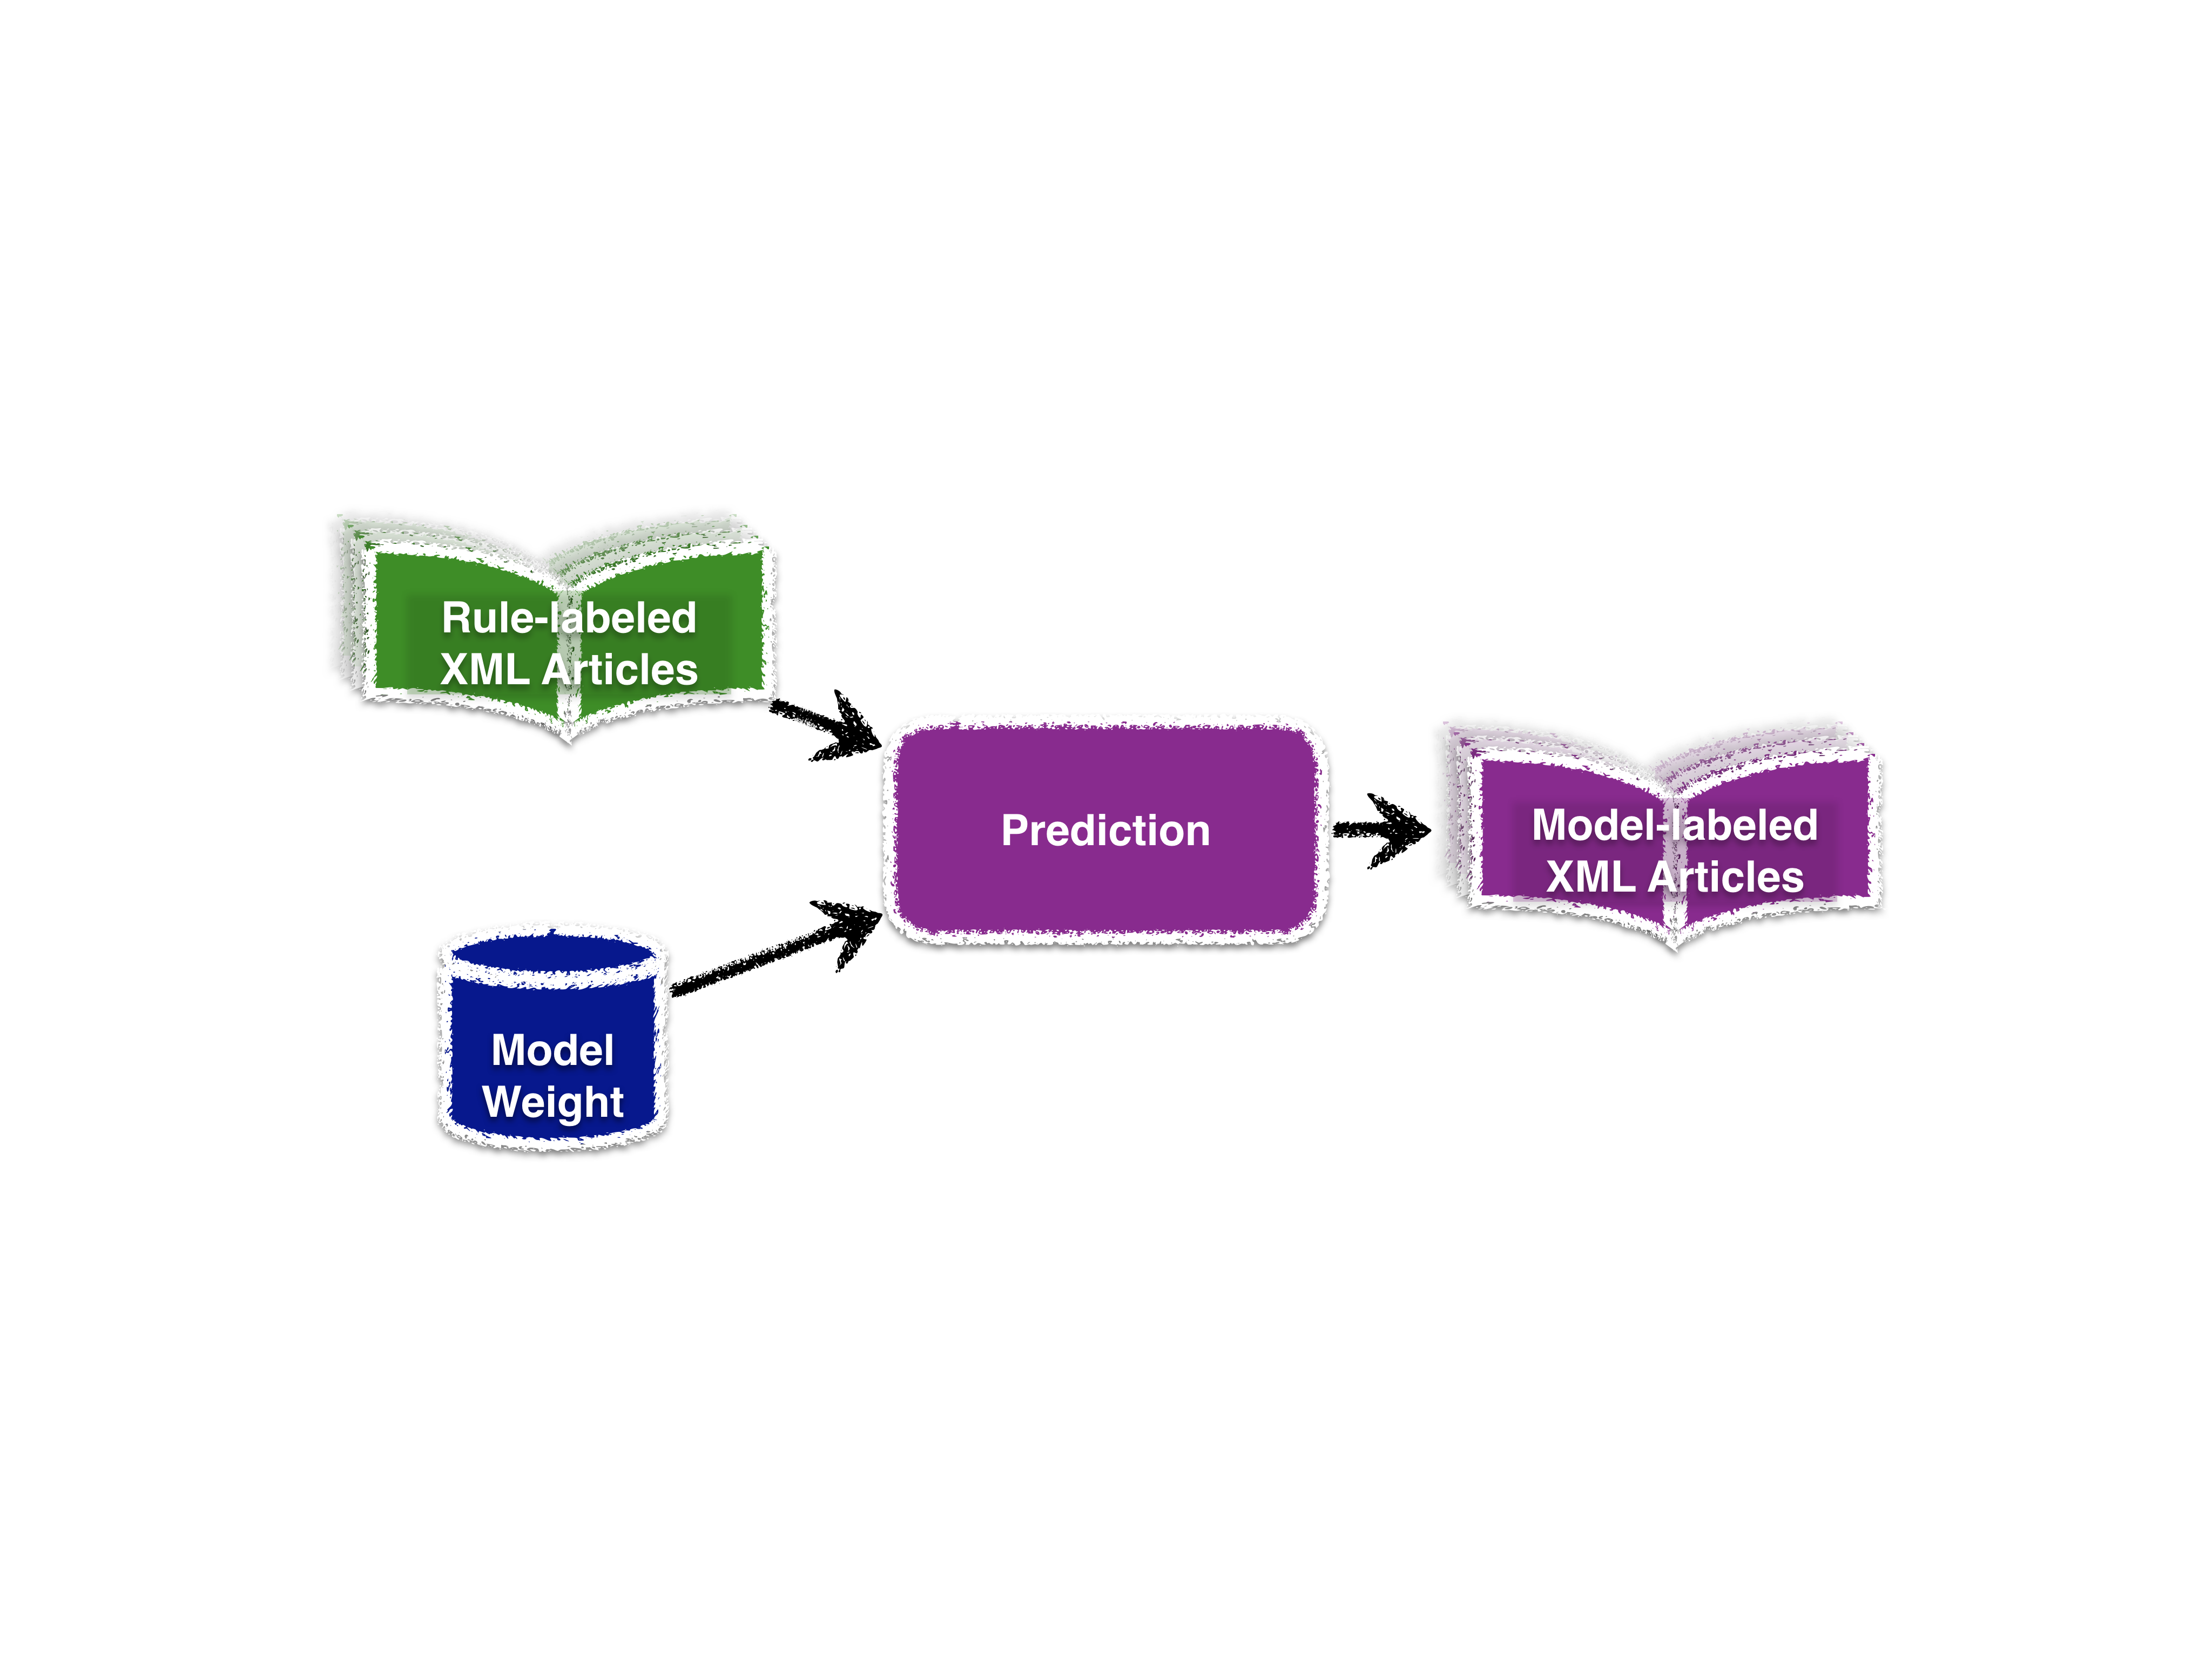
- Prediction
Predicts the mention labels using the model.
See also
- Specification - Model Prediction
- Quick Start - Prediction
Quick Start
Installation
One may install using either pip or Conda.
Install with pip
pip install torch==0.4.1 torchvision
pip install beautifulsoup4==4.6 gensim==3.6 lxml==4.2 numpy==1.15 scikit-learn==0.20 tqdm==4.27
Install with Conda
First install the Conda environment. Conda is an open source package management system. It quickly installs, runs and updates packages and their dependencies.
wget https://repo.continuum.io/miniconda/Miniconda3-latest-Linux-x86_64.sh
sh ./Miniconda3-latest-Linux-x86_64.sh
Make sure to prepend the Miniconda3 install location to PATH in your .bashrc. Now restart your shell to enable PATH, or export it manually:
export PATH="$HOME/miniconda3/bin:$PATH"
Next, create a new Conda environment for CosmEL, named cosmel, with Python version 3.6.
conda create -n cosmel python=3.6
Install Packages
First activate the CosmEL Conda environment:
source activate cosmel
Now, (cosmel) will be appended to the prompt string:
(cosmel) <user>@<host>:~$
Next, install the Python packages:
conda install pytorch=0.4.1 -c pytorch
conda install beautifulsoup4=4.6 gensim=3.4 lxml=4.2 numpy=1.15 scikit-learn=0.20 tqdm=4.26
CKIPWS
Please install the CKIPWS Cython Package. Choose one of the following instruction.
Install With Cython
Denote the root path of CKIPWS as <ckipws-root>.
pip install cython
LIBRARY_PATH=<ckipws-root>/lib:$LIBRARY_PATH pip install ckipws>=0.2
Install Without Cython
Replace <cosmel-root>/cosmel/util/ckipws.py by <cosmel-root>/cosmel/util/ckipws-old.py.
Denote the root path of CosmEL (the folder containing this README) as <cosmel-root>, and the root path of CKIPWS as <ckipws-root>. Copy the following files:
cp <ckipws-root>/lib/libWordSeg.so <cosmel-root>/libWordSeg.so
cp <ckipws-root>/Data2             <cosmel-root>/Data2 -r
You may add <ckipws-root>/lib/ to LD_LIBRARY_PATH instead of copying libWordSeg.so.
Example
First, goto the root path of CosmEL (<cosmel-root>, the folder containing this README), and create the working space for this example (data/demo/).
cd <cosmel-root>
mkdir -p data/demo
Database Generation
Generate database from demo/styleme.csv:
python3 ./util/database_generate.py -i demo/styleme.csv -d data/demo/repo
You can modify data/demo/repo/etc/ to ameliorate the database.
You may also use the predefined database by adding --etc:
python3 ./util/database_generate.py -i demo/styleme.csv -d data/demo/repo --etc
The database are stored in data/demo/repo/.
See also
- Notes - Database Generation
- Specification - Database Generation
- Data Structure - XML Format
Training
In training step, first generate the corpus (data/demo/corpus1/) from the articles (demo/original_article1/). Here demo/repo/ is used as database.
python3 ./tool/corpusgen.py -c data/demo/corpus1 -d demo/repo -i demo/original_article1 -x data/demo/output/rid1 -X data/demo/output/nil1
The rule-labeled articles are exported to data/demo/output/rid1/, and the empty XML articles are exported to data/demo/output/nil1/. You may modify the gid flags in the empty XML articles for manually annotation. (For HTML format, please refer HTML Encoding and HTML Decoding)
Next, you may train word embeddings from the corpus (stored in data/demo/corpus1/embeddings/):
python3 ./util/word2vec.py -c data/demo/corpus1
Or use other embeddings, but make sure that all brand aliases are contained in this embeddings.
Finally, train the model using the corpus (data/demo/corpus1/), with manually-labeled articles demo/purged_article_gid_xml1/ and embeddings file demo/emb1.bin:
python3 ./tool/train.py -c data/demo/corpus1 -m data/demo/model1 -x demo/purged_article_gid_xml1 --emb demo/emb1.bin
The model data are stored in data/demo/model1/.
See also
- Specification - Corpus Generation
- Specification - Word2Vec
- Specification - Model Training
Prediction
In prediction step, first generate the corpus (data/demo/corpus2/) from the articles (demo/original_article2/). Here demo/repo/ is used as database.
python3 ./tool/corpusgen.py -c data/demo/corpus2 -d demo/repo -i demo/original_article2
Next, predict the labels of the corpus (data/demo/corpus2/) with model data/demo/model1/.
python3 ./tool/predict.py -c data/demo/corpus2 -m data/demo/model1 -o data/demo/output/nid2
The results are exported to data/demo/output/nid2/.
See also
- Specification - Corpus Generation
- Specification - Model Prediction
Documentation
To build the documentation, please install the following packages.
(Using pip)
pip install sphinx==1.8.1 sphinx_rtd_theme==0.4.2 sphinxcontrib-programoutput==0.11
(Using Conda)
conda install sphinx=1.8.1 sphinx_rtd_theme=0.4.2
conda install sphinxcontrib-programoutput=0.11 -c conda-forge
Next, build the HTML documentation.
cd <cosmel-root>/docs
make html
The outputs are located in <cosmel-root>/docs/_build/html/.
You may also build PDF documentation using LaTeX if you have latexmk and xelatex installed.
make latex
The outputs are located in <cosmel-root>/docs/_build/latex/.